|
|

楼主 |
发表于 2019-3-1 22:56:14
|
显示全部楼层
自己写的一键搭建shadowsocks/搭建shadowsocksR的shell脚本,一键脚本适用Vultr上的和搬瓦工所有机型(CentOS、Ubuntu、Debian),搭建ss服务器支持所有客户端类型,本机你是iOS,Android,Windows,Mac,或者是Linux,搭建ss/ssr都是适用的科学上网方式。一键脚本搭建SS/SSR服务器,绝对没有任何问题,任何问题欢迎留言。一键脚本内容包括一键搭建shadowsocks/一键搭建shadowsocksR+一键开启bbr加速,适合新手小白。 纯新手也可以搭建ss/ssr,录了个视频教程,不想看文字的可以看视频,或者结合起来一起看:搭建ss视频教程。
文章目录 [url=][/url]
什么是shadowsocksshadowsocks可以指一种SOCKS5的加密传输协议,也可以指基于这种加密协议的各种数据传输包。 shadowsocks实现科学上网原理?shadowsocks正常工作需要服务器端和客户端两端合作实现,首先,客户端(本机)通过ss(shadowsocks)对正常的访问请求进行SOCK5加密,将加密后的访问请求传输给ss服务器端,服务器端接收到客户端的加密请求后,解密得到原始的访问请求,根据请求内容访问指定的网站(例如Google,YouTube,Facebook,instagram等),得到网站的返回结果后,再利用SOCKS5加密并返回给客户端,客户端通过ss解密后得到正常的访问结果,于是就可以实现你直接访问该网站的“假象”。 为什么选择shadowsocks?不限终端(安卓,苹果,Windows,Mac都可用),流量便宜(服务器500G只要15元),方便(一键脚本,不需要专业知识)。 为什么要自己搭建ss/ssr?你也许会觉得买ss服务也很方便,但是你得要考虑以下几个问题。首先,买的ss服务,限制很多,终端可能只能同时在线2个,每个月就一点点流量可能价格却不便宜,有时候还被别人做手脚,流量跑的贼快;其次,别人收钱跑路怎么办?很多这种情况的;更重要的是,如第一个问题中描述的shadowsocks原理,如果有心人做了一点手脚,是可以得到你的访问记录的;而自己搭建ss/ssr服务,一键脚本也就10来分钟就可以搞定。
一键脚本搭建ss/ssr支持系统版本脚本系统支持:CentOS 6+,Debian 7+,Ubuntu 12+ 注:这个脚本支持的系统版本是指ss服务器的版本(都没看过也没关系,不影响搭建),你本机是Windows、Mac、Linux,或者你想用手机端搭建ss/ssr服务器,安卓和苹果,都是可以的。
代理服务器购买作为跳板的代理服务器推荐Vultr和搬瓦工,一是因为本脚本在这两家的所有VPS都做了测试,二是因为都是老牌VPS服务商,不怕跑路。 移动用户推荐使用Vultr亚洲日本或新加坡机房:优惠注册链接,购买图解与节点推荐可以参考Vultr购买图解步骤,最低月付3.5刀(2.5美元/月的无IPv4无法使用),月付方便,随时重置。 Vultr和搬瓦工上的所有机型是绝对可以一键脚本搭建shadowsocks/搭建shadowsocksR+开启bbr加速成功的,任何问题欢迎留言~
连接远程Linux服务器你如果身边没有电脑,一定要搞什么手机搭建ss服务器  也是可以的,毕竟一键脚本只需要复制几行脚本命令就行了。iOS用户可以使用Termius这个工具,直接在App Store下载就行。Android没有用过,反正能ssh连接的软件就行~ 也是可以的,毕竟一键脚本只需要复制几行脚本命令就行了。iOS用户可以使用Termius这个工具,直接在App Store下载就行。Android没有用过,反正能ssh连接的软件就行~
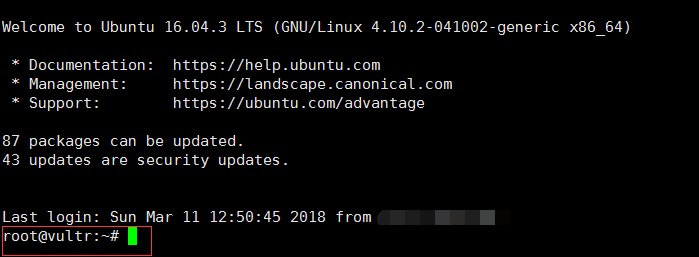
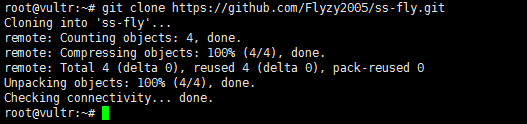
一键搭建SS/搭建SSR服务注意,shadowsocks/shadowsocksR这两个只需要搭建一个就可以了!!!!SS与SSR之间的比较一直是各有各的说法,王婆卖瓜自卖自夸。我用的是SS,因为SS的iOS版本比较容易下载,并且被没有觉得ss容易被探查到~ 一键搭建shadowsocks如红框中所示,root@vult(root@ubuntu)说明已经连接成功了,之后你只需要在绿色光标处直接复制以下代码就可以了(直接复制即可,如每段代码下方截图中所示)。 1.下载一键搭建ss脚本文件(直接在绿色光标处复制该行命令回车即可,只需要执行一次,卸载ss后也不需要重新下载) [backcolor=rgb(248, 248, 255) !important]
[color=rgb(170, 170, 170) !important]1
| [color=teal !important]git clone[color=rgb(0, 111, 224) !important] [color=rgb(0, 111, 224) !important]-b[color=rgb(0, 111, 224) !important] [color=teal !important]master [color=rgb(0, 45, 122) !important]https[color=rgb(0, 111, 224) !important]:[color=rgb(153, 153, 153) !important]//github.com/flyzy2005/ss-fly
|
如果提示bash: git: command not found,则先安装git: [backcolor=rgb(248, 248, 255) !important]
[color=rgb(170, 170, 170) !important]1
[color=rgb(170, 170, 170) !important]2
| Centos执行这个:[color=rgb(0, 111, 224) !important] [color=rgb(0, 45, 122) !important]yum[color=rgb(0, 111, 224) !important] [color=rgb(0, 111, 224) !important]-y[color=rgb(0, 111, 224) !important] [color=teal !important]install [color=teal !important]git
[color=rgb(0, 45, 122) !important]Ubuntu[color=rgb(0, 111, 224) !important]/Debian执行这个:[color=rgb(0, 111, 224) !important] [color=rgb(0, 45, 122) !important]apt[color=rgb(0, 111, 224) !important]-[color=teal !important]get [color=rgb(0, 45, 122) !important]update[color=rgb(0, 111, 224) !important] [color=rgb(0, 111, 224) !important]&&[color=rgb(0, 111, 224) !important] [color=rgb(0, 45, 122) !important]apt[color=rgb(0, 111, 224) !important]-[color=rgb(0, 45, 122) !important]get[color=rgb(0, 111, 224) !important] [color=rgb(0, 111, 224) !important]-y[color=rgb(0, 111, 224) !important] [color=teal !important]install [color=rgb(0, 45, 122) !important]git
|
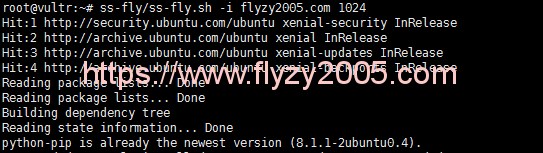
2.运行搭建ss脚本代码 [backcolor=rgb(248, 248, 255) !important]
[color=rgb(170, 170, 170) !important]1
| [color=rgb(0, 45, 122) !important]ss[color=rgb(0, 111, 224) !important]-[color=rgb(0, 45, 122) !important]fly[color=rgb(0, 111, 224) !important]/[color=rgb(0, 45, 122) !important]ss[color=rgb(0, 111, 224) !important]-[color=rgb(0, 45, 122) !important]fly[color=rgb(51, 51, 51) !important].[color=rgb(0, 45, 122) !important]sh[color=rgb(0, 111, 224) !important] [color=rgb(0, 111, 224) !important]-i[color=rgb(0, 111, 224) !important] [color=rgb(0, 45, 122) !important]flyzy2005[color=rgb(51, 51, 51) !important].com[color=rgb(0, 111, 224) !important] [color=rgb(0, 153, 153) !important]1024
|
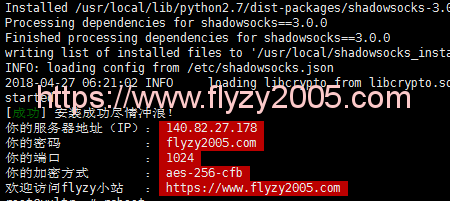
其中flyzy2005.com换成你要设置的shadowsocks的密码即可(这个flyzy2005.com就是你ss的密码了,是需要填在客户端的密码那一栏的),密码随便设置,最好只包含字母+数字,一些特殊字符可能会导致冲突。而第二个参数1024是端口号,也可以不加,不加默认是1024~(举个例子,脚本命令可以是ss-fly/ss-fly.sh -i qwerasd,也可以是ss-fly/ss-fly.sh -i qwerasd 8585,后者指定了服务器端口为8585,前者则是默认的端口号1024,两个命令设置的ss密码都是qwerasd): 界面如下就表示一键搭建ss成功了: 注:如果需要改密码或者改端口,只需要重新再执行一次搭建ss脚本代码就可以了,或者修改/etc/shadowsocks.json这个配置文件。 3.相关ss操作 [backcolor=rgb(248, 248, 255) !important]
[color=rgb(170, 170, 170) !important]1
[color=rgb(170, 170, 170) !important]2
[color=rgb(170, 170, 170) !important]3
[color=rgb(170, 170, 170) !important]4
[color=rgb(170, 170, 170) !important]5
[color=rgb(170, 170, 170) !important]6
| 启动:[color=rgb(0, 111, 224) !important]/[color=rgb(0, 45, 122) !important]etc[color=rgb(0, 111, 224) !important]/[color=rgb(0, 45, 122) !important]init[color=rgb(51, 51, 51) !important].[color=rgb(0, 45, 122) !important]d[color=rgb(0, 111, 224) !important]/[color=rgb(0, 45, 122) !important]ss[color=rgb(0, 111, 224) !important]-[color=teal !important]fly start
停止:[color=rgb(0, 111, 224) !important]/[color=rgb(0, 45, 122) !important]etc[color=rgb(0, 111, 224) !important]/[color=rgb(0, 45, 122) !important]init[color=rgb(51, 51, 51) !important].[color=rgb(0, 45, 122) !important]d[color=rgb(0, 111, 224) !important]/[color=rgb(0, 45, 122) !important]ss[color=rgb(0, 111, 224) !important]-[color=teal !important]fly stop
重启:[color=rgb(0, 111, 224) !important]/[color=rgb(0, 45, 122) !important]etc[color=rgb(0, 111, 224) !important]/[color=rgb(0, 45, 122) !important]init[color=rgb(51, 51, 51) !important].[color=rgb(0, 45, 122) !important]d[color=rgb(0, 111, 224) !important]/[color=rgb(0, 45, 122) !important]ss[color=rgb(0, 111, 224) !important]-[color=teal !important]fly restart
状态:[color=rgb(0, 111, 224) !important]/[color=rgb(0, 45, 122) !important]etc[color=rgb(0, 111, 224) !important]/[color=rgb(0, 45, 122) !important]init[color=rgb(51, 51, 51) !important].[color=rgb(0, 45, 122) !important]d[color=rgb(0, 111, 224) !important]/[color=rgb(0, 45, 122) !important]ss[color=rgb(0, 111, 224) !important]-[color=teal !important]fly status
查看ss链接:[color=rgb(0, 45, 122) !important]ss[color=rgb(0, 111, 224) !important]-[color=rgb(0, 45, 122) !important]fly[color=rgb(0, 111, 224) !important]/[color=rgb(0, 45, 122) !important]ss[color=rgb(0, 111, 224) !important]-[color=rgb(0, 45, 122) !important]fly[color=rgb(51, 51, 51) !important].[color=rgb(0, 45, 122) !important]sh[color=rgb(0, 111, 224) !important] [color=rgb(0, 111, 224) !important]-sslink
修改配置文件:[color=rgb(0, 45, 122) !important]vim[color=rgb(0, 111, 224) !important] [color=rgb(0, 111, 224) !important]/[color=rgb(0, 45, 122) !important]etc[color=rgb(0, 111, 224) !important]/[color=rgb(0, 45, 122) !important]shadowsocks[color=rgb(51, 51, 51) !important].[color=rgb(0, 45, 122) !important]json
|
4.卸载ss服务 [backcolor=rgb(248, 248, 255) !important]
[color=rgb(170, 170, 170) !important]1
| [color=rgb(0, 45, 122) !important]ss[color=rgb(0, 111, 224) !important]-[color=rgb(0, 45, 122) !important]fly[color=rgb(0, 111, 224) !important]/[color=rgb(0, 45, 122) !important]ss[color=rgb(0, 111, 224) !important]-[color=rgb(0, 45, 122) !important]fly[color=rgb(51, 51, 51) !important].[color=rgb(0, 45, 122) !important]sh[color=rgb(0, 111, 224) !important] [color=rgb(0, 111, 224) !important]-[color=rgb(0, 45, 122) !important]uninstall
|
一键搭建shadowsocksR再次提醒,如果安装了SS,就不需要再安装SSR了,如果要改装SSR,请按照上一部分内容的教程先卸载SS!!! 1.下载一键搭建ssr脚本(只需要执行一次,卸载ssr后也不需要重新执行) 2.运行搭建ssr脚本代码 [backcolor=rgb(248, 248, 255) !important]
[color=rgb(170, 170, 170) !important]1
| [color=rgb(0, 45, 122) !important]ss[color=rgb(0, 111, 224) !important]-[color=rgb(0, 45, 122) !important]fly[color=rgb(0, 111, 224) !important]/[color=rgb(0, 45, 122) !important]ss[color=rgb(0, 111, 224) !important]-[color=rgb(0, 45, 122) !important]fly[color=rgb(51, 51, 51) !important].[color=rgb(0, 45, 122) !important]sh[color=rgb(0, 111, 224) !important] [color=rgb(0, 111, 224) !important]-[color=rgb(0, 45, 122) !important]ssr
|
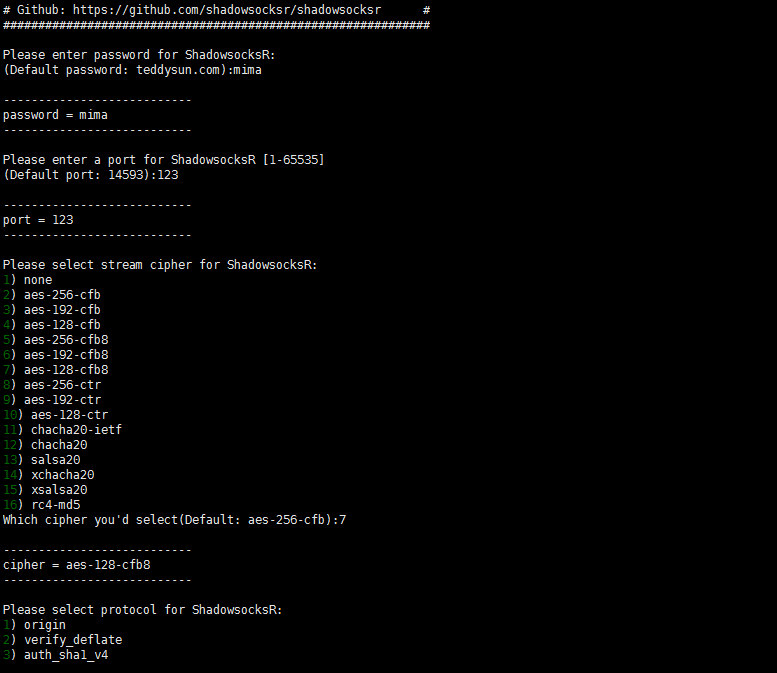
3.输入对应的参数 执行完上述的脚本代码后,会进入到输入参数的界面,包括服务器端口,密码,加密方式,协议,混淆。可以直接输入回车选择默认值,也可以输入相应的值选择对应的选项: 全部选择结束后,会看到如下界面,就说明搭建ssr成功了: [backcolor=rgb(248, 248, 255) !important]
[color=rgb(170, 170, 170) !important]1
[color=rgb(170, 170, 170) !important]2
[color=rgb(170, 170, 170) !important]3
[color=rgb(170, 170, 170) !important]4
[color=rgb(170, 170, 170) !important]5
[color=rgb(170, 170, 170) !important]6
[color=rgb(170, 170, 170) !important]7
[color=rgb(170, 170, 170) !important]8
[color=rgb(170, 170, 170) !important]9
[color=rgb(170, 170, 170) !important]10
| [color=rgb(0, 45, 122) !important]Congratulations[color=rgb(51, 51, 51) !important],[color=rgb(0, 111, 224) !important] [color=teal !important]ShadowsocksR [color=teal !important]server [color=teal !important]install [color=rgb(0, 45, 122) !important]completed[color=rgb(0, 111, 224) !important]!
[color=teal !important]Your [color=teal !important]Server [color=rgb(0, 45, 122) !important]IP[color=rgb(0, 111, 224) !important] [color=rgb(0, 111, 224) !important]:你的服务器[color=teal !important]ip
[color=teal !important]Your [color=teal !important]Server [color=rgb(0, 45, 122) !important]Port[color=rgb(0, 111, 224) !important] [color=rgb(0, 111, 224) !important]:你的端口
[color=teal !important]Your [color=rgb(0, 45, 122) !important]Password[color=rgb(0, 111, 224) !important] [color=rgb(0, 111, 224) !important]:你的密码
[color=teal !important]Your [color=rgb(0, 45, 122) !important]Protocol[color=rgb(0, 111, 224) !important] [color=rgb(0, 111, 224) !important]:你的协议
[color=teal !important]Your [color=rgb(0, 45, 122) !important]obfs[color=rgb(0, 111, 224) !important] [color=rgb(0, 111, 224) !important]:你的混淆
[color=teal !important]Your [color=teal !important]Encryption [color=rgb(0, 45, 122) !important]Method[color=rgb(0, 111, 224) !important]:[color=teal !important]your_encryption_method
[color=teal !important]Welcome to[color=rgb(0, 111, 224) !important] [color=rgb(0, 45, 122) !important]visit[color=rgb(0, 111, 224) !important]:[color=rgb(0, 45, 122) !important]https[color=rgb(0, 111, 224) !important]:[color=rgb(153, 153, 153) !important]//shadowsocks.be/9.html
[color=teal !important]Enjoy [color=rgb(0, 45, 122) !important]it[color=rgb(0, 111, 224) !important]!
|
4.相关操作ssr命令 [backcolor=rgb(248, 248, 255) !important]
[color=rgb(170, 170, 170) !important]1
[color=rgb(170, 170, 170) !important]2
[color=rgb(170, 170, 170) !important]3
[color=rgb(170, 170, 170) !important]4
[color=rgb(170, 170, 170) !important]5
[color=rgb(170, 170, 170) !important]6
[color=rgb(170, 170, 170) !important]7
[color=rgb(170, 170, 170) !important]8
| 启动:[color=rgb(0, 111, 224) !important]/[color=rgb(0, 45, 122) !important]etc[color=rgb(0, 111, 224) !important]/[color=rgb(0, 45, 122) !important]init[color=rgb(51, 51, 51) !important].[color=rgb(0, 45, 122) !important]d[color=rgb(0, 111, 224) !important]/[color=teal !important]shadowsocks start
停止:[color=rgb(0, 111, 224) !important]/[color=rgb(0, 45, 122) !important]etc[color=rgb(0, 111, 224) !important]/[color=rgb(0, 45, 122) !important]init[color=rgb(51, 51, 51) !important].[color=rgb(0, 45, 122) !important]d[color=rgb(0, 111, 224) !important]/[color=teal !important]shadowsocks stop
重启:[color=rgb(0, 111, 224) !important]/[color=rgb(0, 45, 122) !important]etc[color=rgb(0, 111, 224) !important]/[color=rgb(0, 45, 122) !important]init[color=rgb(51, 51, 51) !important].[color=rgb(0, 45, 122) !important]d[color=rgb(0, 111, 224) !important]/[color=teal !important]shadowsocks restart
状态:[color=rgb(0, 111, 224) !important]/[color=rgb(0, 45, 122) !important]etc[color=rgb(0, 111, 224) !important]/[color=rgb(0, 45, 122) !important]init[color=rgb(51, 51, 51) !important].[color=rgb(0, 45, 122) !important]d[color=rgb(0, 111, 224) !important]/[color=teal !important]shadowsocks status
配置文件路径:[color=rgb(0, 111, 224) !important]/[color=rgb(0, 45, 122) !important]etc[color=rgb(0, 111, 224) !important]/[color=rgb(0, 45, 122) !important]shadowsocks[color=rgb(51, 51, 51) !important].json
日志文件路径:[color=rgb(0, 111, 224) !important]/[color=purple !important]var[color=rgb(0, 111, 224) !important]/[color=rgb(0, 45, 122) !important]log[color=rgb(0, 111, 224) !important]/[color=rgb(0, 45, 122) !important]shadowsocks[color=rgb(51, 51, 51) !important].log
代码安装目录:[color=rgb(0, 111, 224) !important]/[color=rgb(0, 45, 122) !important]usr[color=rgb(0, 111, 224) !important]/[color=rgb(0, 45, 122) !important]local[color=rgb(0, 111, 224) !important]/[color=rgb(0, 45, 122) !important]shadowsocks
|
5.卸载ssr服务 [backcolor=rgb(248, 248, 255) !important]
[color=rgb(170, 170, 170) !important]1
| [color=rgb(51, 51, 51) !important].[color=rgb(0, 111, 224) !important]/[color=rgb(0, 45, 122) !important]shadowsocksR[color=rgb(51, 51, 51) !important].[color=teal !important]sh [color=rgb(0, 45, 122) !important]uninstall
|
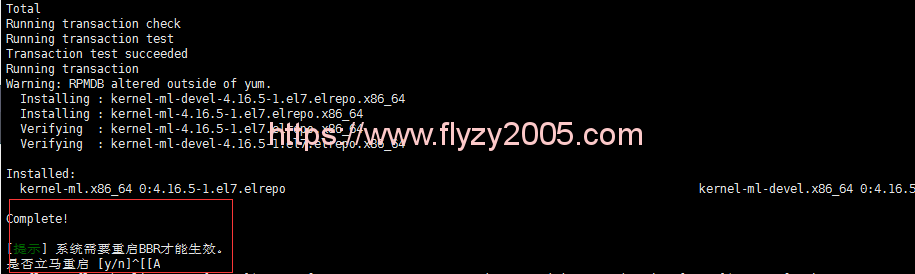
一键开启BBR加速BBR是Google开源的一套内核加速算法,可以让你搭建的shadowsocks/shadowsocksR速度上一个台阶,本一键搭建ss/ssr脚本支持一键升级最新版本的内核并开启BBR加速。 BBR支持4.9以上的,如果低于这个版本则会自动下载最新内容版本的内核后开启BBR加速并重启,如果高于4.9以上则自动开启BBR加速,执行如下脚本命令即可自动开启BBR加速: [backcolor=rgb(248, 248, 255) !important]
[color=rgb(170, 170, 170) !important]1
| [color=rgb(0, 45, 122) !important]ss[color=rgb(0, 111, 224) !important]-[color=rgb(0, 45, 122) !important]fly[color=rgb(0, 111, 224) !important]/[color=rgb(0, 45, 122) !important]ss[color=rgb(0, 111, 224) !important]-[color=rgb(0, 45, 122) !important]fly[color=rgb(51, 51, 51) !important].[color=rgb(0, 45, 122) !important]sh[color=rgb(0, 111, 224) !important] [color=rgb(0, 111, 224) !important]-[color=rgb(0, 45, 122) !important]bbr
|
装完后需要重启系统,输入y即可立即重启,或者之后输入reboot命令重启。 判断BBR加速有没有开启成功。输入以下命令: [backcolor=rgb(248, 248, 255) !important]
[color=rgb(170, 170, 170) !important]1
| [color=teal !important]sysctl [color=rgb(0, 45, 122) !important]net[color=rgb(51, 51, 51) !important].[color=rgb(0, 45, 122) !important]ipv4[color=rgb(51, 51, 51) !important].[color=rgb(0, 45, 122) !important]tcp_available_congestion_control
|
如果返回值为: [backcolor=rgb(248, 248, 255) !important]
[color=rgb(170, 170, 170) !important]1
| [color=rgb(0, 45, 122) !important]net[color=rgb(51, 51, 51) !important].[color=rgb(0, 45, 122) !important]ipv4[color=rgb(51, 51, 51) !important].[color=rgb(0, 45, 122) !important]tcp_available_congestion_control[color=rgb(0, 111, 224) !important] [color=rgb(0, 111, 224) !important]=[color=rgb(0, 111, 224) !important] [color=teal !important]bbr [color=teal !important]cubic [color=rgb(0, 45, 122) !important]reno
|
后面有bbr,则说明已经开启成功了。
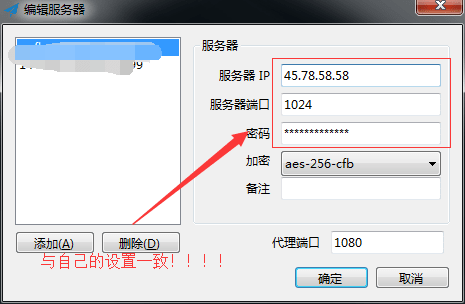
客户端搭建shadowsocks/shadowsockR代理实现科学上网客户端搭建ss代理在状态栏右击shadowsocks,勾选开机启动和启动系统代理,在系统代理模式中选择PAC模式,服务器->编辑服务器,一键安装shadowsocks的脚本默认服务器端口是1024,加密方式是aes-256-cfb,密码是你设置的密码,ip是你自己的VPS ip,保存即可~ PAC模式是指国内可以访问的站点直接访问,不能直接访问的再走shadowsocks代理~ OK!一键脚本搭建shadowsocks完毕!科学上网吧,兄弟!Google
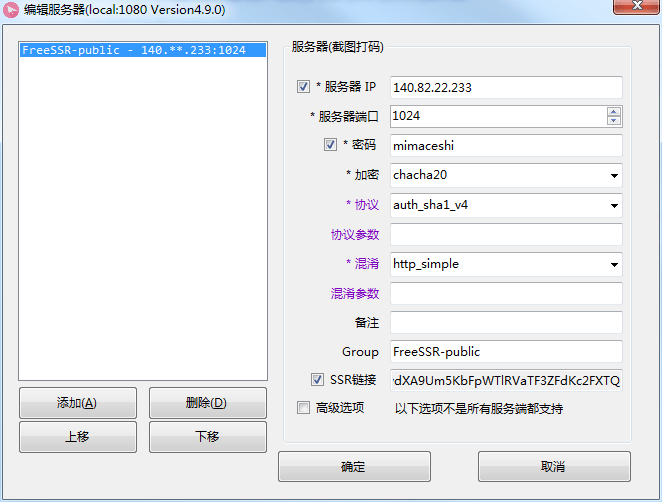
客户端搭建ssr代理以Windows为例: 在状态栏右击shadowsocksR,在系统代理模式中选择PAC模式,再左击两次状态栏的图标打开编辑服务器界面,如上图所示,按照自己的服务器配置填充内容,保存即可~ PAC模式是指国内可以访问的站点直接访问,不能直接访问的再走shadowsocksR代理~ OK!一键脚本搭建shadowsocksR完毕!科学上网吧,兄弟!Google
vultr搭建ss视频教程应读者要求录了个视频教程,如果你觉得这些文字还不够生动,不够清楚的话,可以看一下视频教程。 视频获取方式:关注微信公众号flyzy小站,发送视频即可获得。
一键脚本更新日志2018年1月20日,上传一键安装shadowsocks脚本 2018年1月24日,添加升级内核并开启BBR加速功能 2018年3月28日,将升级内核&&开启BBR加速集成在一个命令中 2018年4月4日,添加一键安装shadowsocksR功能(调用的teddysun大大的一键搭建SSR脚本  ) ) 2018年4月27日,支持Ubuntu/CentOS/Debian 2018年8月8日,增加了一点ss状态查看/控制的代码(抄的) 2018年10月14日,增加显示ss链接(默认安装完直接显示,后期调用则通过命令ss-fly/ss-fly.sh -sslink查看)
关注公众号flyzy小站,上面有一些搭建shadowsocks常见问题的总结~如果还是不行,欢迎在公众号留言~
声明:本文只作为技术分享,请遵守相关法律,严禁做违法乱纪的事情! |
|
 /2
/2 


 发表于 2018-4-22 14:59:39